"Blogumus" is an Flash based tag cloud widget which uses scripts converted from Roy Tanck's WP Cumulus plugin for Wordpress. I fell in love with Roy's original Cumulus plugin when I saw it, and simply had to learn how to convert this for use in Blogger powered blogs. The result is the widget you can see in action at the top of this post. Hover your mouse over the Flash object to see the animation begin.
In this post, I'll explain how you can add Blogumus to your own Blogger layout with ease!Update: Improved Widget Code
I have updated the code required to run this widget to activate links in the tag cloud Flash movie. If you have already installed Blogumus, please replace your widget code with the new updated code, or reference the additional lines to modify your existing installation.How it works
This widget uses a combination of JavaScript and Flash animation to parse and display your blog labels. Once installed in your template, it should work "out of the box" without any additional tweaking required, though of course you may prefer to change the variables for color, background and size if appropriate :)
You should also be able to move the Label Cloud widget through the Page Elements page of your dashboard if you prefer display in a different layout location.
To see Blogumus in action, both Flash and Javascript must be installed and enabled for your internet browser. However, it does degrade relatively gracefully, and label links will still be clickable (though not animated) for those who do not use JavaScript of Flash (including search engine spiders).How to install Blogumus in your Blogger layout
Installing Blogumus in your Blogger layout is surprisingly simple! You should only need to copy and paste a section of code to your Blogger template, though any tweaks for the style of display will require some manual editing.
Here are the steps required to install Blogumus in your Blogger layout:
Go to Layout>Edit HTML in your Blogger dashboard, and search for the following line (or similar):
Immediatly after this line, paste the following section of code:
Then preview your template. If installed correctly, you should see the tag cloud appear in your sidebar. Then you are free to save your template, edit the colors and dimensions as required, or move it to a different location.
That's all!Customizing Blogumus
In this default installation, Blogumus includes the following preset variables:
If you would prefer to make your widget wider, shorter, change the color scheme, etc, you will need to do this by editing various parts of the code. I'll go through these options in the order they appear in the widget code.
Editing width and height
The variables for width and height are found in this line of the script: var so = new SWFObject("http://halotemplates.s3.amazonaws.com/wp-cumulus-example/tagcloud.swf", "tagcloud", "240", "300", "7", "#ffffff");
The width (currently 240) is highlighted in red, while the height (300px default) is highlighted in blue. These numerical values specify the width and height in pixels, so you can alter these of you prefer.
Editing background color
You can change the background color from white to any other color by altering the hex value in the same line: var so = new SWFObject("http://halotemplates.s3.amazonaws.com/wp-cumulus-example/tagcloud.swf", "tagcloud", "240", "300", "7", "#ffffff");
For example, if you prefer a bright red background, you may replace #ffffff with #ff0000. Take a look at this page for a list of commonly used hex color codes.
Alter the color of text
By default, the text is set to display as dark grey ( hex value #333333). You can alter this variable in the following line:so.addVariable("tcolor", "0x333333");
Be aware that "tcolor" is a Flash variable and doesn't include the usual hash symbol of hex color codes. Be sure to only replace the numbers!
Adjust the font size
The maximum font size of tags is specified in this line: so.addVariable("tagcloud", "
You can alter this to ensure tags are displayed in a bigger or smaller font if you prefer by changing "12" to a larger or smaller number.
While making any of these changes, you should be able to preview your widget and be certain that your new choice of color, dimensions and background are suitable for your needs.Credits, support and requirements
Blogumus is based on the original WP Cumulus plugin by Roy Tanck, and was converted for use with Blogger layouts by myself.
Please leave the credit links in the widget code intact. These will not be seen by the majority of your blog readers (as they will only display if JavaScript and Flash is not activated) but leaving these links intact is a great way of passing some link love on to Roy for all his hard work, and to inform other Blogger users that they can find the widget codes on this site.Support/Issues
If you have any problems installing or using this widget, please leave your comments below or direct these to the Blogger Buster forums as Roy will be unable to provide support for installation in Blogger blogs!Requirements
For Blogumus to display properly in your template, you will need to have Flash Player 7 or higher. You can download the latest Flash Player plugin for your browser from Adobe.
I'm not sure that this installation will support special characters as tags (only Latin characters supported at present). If you do experiecce issues with labels displaying incorrectly, please let me know. I'll try to add more support, but have very little experience using Flash!Your thoughts?
I hope that you enjoy using Blogumus in your own Blogger blogs! Please feel free to share or syndicate this page with your favorite bookmarking service if you think it is worth a mention, or subscribe to the newsfeed to learn of more great Blogger tutorials as they are posted.
Blogumus: a flash animated label cloud for Blogger!
Posted by SoMeOnE at 8:46 AM Labels: Gadgets, Labels Categories and TagsBlogumus: a flash animated label cloud for Blogger!
Posted by SoMeOnE at 8:46 AM Labels: Gadgets, Labels Categories and Tags
"Blogumus" is an Flash based tag cloud widget which uses scripts converted from Roy Tanck's WP Cumulus plugin for Wordpress. I fell in love with Roy's original Cumulus plugin when I saw it, and simply had to learn how to convert this for use in Blogger powered blogs. The result is the widget you can see in action at the top of this post. Hover your mouse over the Flash object to see the animation begin.
In this post, I'll explain how you can add Blogumus to your own Blogger layout with ease!Update: Improved Widget Code
I have updated the code required to run this widget to activate links in the tag cloud Flash movie. If you have already installed Blogumus, please replace your widget code with the new updated code, or reference the additional lines to modify your existing installation.How it works
This widget uses a combination of JavaScript and Flash animation to parse and display your blog labels. Once installed in your template, it should work "out of the box" without any additional tweaking required, though of course you may prefer to change the variables for color, background and size if appropriate :)
You should also be able to move the Label Cloud widget through the Page Elements page of your dashboard if you prefer display in a different layout location.
To see Blogumus in action, both Flash and Javascript must be installed and enabled for your internet browser. However, it does degrade relatively gracefully, and label links will still be clickable (though not animated) for those who do not use JavaScript of Flash (including search engine spiders).How to install Blogumus in your Blogger layout
Installing Blogumus in your Blogger layout is surprisingly simple! You should only need to copy and paste a section of code to your Blogger template, though any tweaks for the style of display will require some manual editing.
Here are the steps required to install Blogumus in your Blogger layout:
Go to Layout>Edit HTML in your Blogger dashboard, and search for the following line (or similar):
Immediatly after this line, paste the following section of code:
Then preview your template. If installed correctly, you should see the tag cloud appear in your sidebar. Then you are free to save your template, edit the colors and dimensions as required, or move it to a different location.
That's all!Customizing Blogumus
In this default installation, Blogumus includes the following preset variables:
If you would prefer to make your widget wider, shorter, change the color scheme, etc, you will need to do this by editing various parts of the code. I'll go through these options in the order they appear in the widget code.
Editing width and height
The variables for width and height are found in this line of the script: var so = new SWFObject("http://halotemplates.s3.amazonaws.com/wp-cumulus-example/tagcloud.swf", "tagcloud", "240", "300", "7", "#ffffff");
The width (currently 240) is highlighted in red, while the height (300px default) is highlighted in blue. These numerical values specify the width and height in pixels, so you can alter these of you prefer.
Editing background color
You can change the background color from white to any other color by altering the hex value in the same line: var so = new SWFObject("http://halotemplates.s3.amazonaws.com/wp-cumulus-example/tagcloud.swf", "tagcloud", "240", "300", "7", "#ffffff");
For example, if you prefer a bright red background, you may replace #ffffff with #ff0000. Take a look at this page for a list of commonly used hex color codes.
Alter the color of text
By default, the text is set to display as dark grey ( hex value #333333). You can alter this variable in the following line:so.addVariable("tcolor", "0x333333");
Be aware that "tcolor" is a Flash variable and doesn't include the usual hash symbol of hex color codes. Be sure to only replace the numbers!
Adjust the font size
The maximum font size of tags is specified in this line: so.addVariable("tagcloud", "
You can alter this to ensure tags are displayed in a bigger or smaller font if you prefer by changing "12" to a larger or smaller number.
While making any of these changes, you should be able to preview your widget and be certain that your new choice of color, dimensions and background are suitable for your needs.Credits, support and requirements
Blogumus is based on the original WP Cumulus plugin by Roy Tanck, and was converted for use with Blogger layouts by myself.
Please leave the credit links in the widget code intact. These will not be seen by the majority of your blog readers (as they will only display if JavaScript and Flash is not activated) but leaving these links intact is a great way of passing some link love on to Roy for all his hard work, and to inform other Blogger users that they can find the widget codes on this site.Support/Issues
If you have any problems installing or using this widget, please leave your comments below or direct these to the Blogger Buster forums as Roy will be unable to provide support for installation in Blogger blogs!Requirements
For Blogumus to display properly in your template, you will need to have Flash Player 7 or higher. You can download the latest Flash Player plugin for your browser from Adobe.
I'm not sure that this installation will support special characters as tags (only Latin characters supported at present). If you do experiecce issues with labels displaying incorrectly, please let me know. I'll try to add more support, but have very little experience using Flash!Your thoughts?
I hope that you enjoy using Blogumus in your own Blogger blogs! Please feel free to share or syndicate this page with your favorite bookmarking service if you think it is worth a mention, or subscribe to the newsfeed to learn of more great Blogger tutorials as they are posted.
Blogger Tutorials in Progress (What I'm working on now)
Posted by SoMeOnE at 4:45 PM Labels: Announcements This week, I seem to have had a great spurt of creativity, and now have quite a few new tutorials/templates in progress which I have not yet had time to document!
Those of you who follow my updates on Twitter may already have some ideas of what's in store for Blogger Buster over the next few weeks. In any case, I am so excited about some of these new developments that I feel I ought to write a quick update to offer some insights of what I'm working on, and when these projects may become available as tutorials.
New templates
I have two (possibly three) new templates which are almost ready to be released. These are original, "made for Blogger" designs which I hope to perfect and upload within the next week or two.I've taken a lot of inspiration from grid based designs for these new templates: the first is a minimalist template (with many options for customization), while the second is much more stylized and color-rich.
As some of you may have noticed, I'm still experiencing problems with my file host, though once I've been able to move everything over to the new server, I'll be able to complete and distribute these themes.
Creating an "Asides/Sideblog" section for Blogger
I've always envied the Wordpress function which allows bloggers to display a "sideblog" in the sidebar (a list of posts separate from the main section which often refer to recommended links or very short updates).Luckily, I've managed to tweak the Blogger template code to allow certain labels to be filtered from the main display of posts on the homepage. This will enable us to display these particular posts as a "sideblog" in the sidebar without being replicated elsewhere on the page.
This method does have some caveats (and a few minor issues, which I'm working on now), but for anyone interested in developing a sideblog I'm sure this will be a useful addition to the arsenal of Blogger hacks available ;)
A improved method of posting excerpts on the home page
For over a year now, I've been using Ramani's excellent hack to display excerpts of my posts on the homepage of Blogger Buster.However, I must admit that this has never satisfied my desire to display a true excerpt (based on the number of words/characters) which does not rely on editing the HTML code for each post.
So after MUCH searching, experimentation and tweaking, I think I have found a much more preferable solution which uses JavaScript and minimal editing of the template code.
At present, the JavaScript is quite bloated and the results differ between browsers. But at least it works! Once I am happy with the overall functions, I'll begin to use this function here on Blogger Buster and will of course write up a full tutorial for you to use this in your own Blogger template designs.
Animated tag cloud
This is the function I am most excited about! Thanks to Roberto, I learned about a beautiful animated tag cloud plugin which had been made available for Wordpress users. Needless to say I was fascinated by this, and was able to convert for use in Blogger templates:Blogger Tutorials in Progress (What I'm working on now)
Posted by SoMeOnE at 4:45 PM Labels: AnnouncementsThis week, I seem to have had a great spurt of creativity, and now have quite a few new tutorials/templates in progress which I have not yet had time to document!Those of you who follow my updates on Twitter may already have some ideas of what's in store for Blogger Buster over the next few weeks. In any case, I am so excited about some of these new developments that I feel I ought to write a quick update to offer some insights of what I'm working on, and when these projects may become available as tutorials.
New templates
I have two (possibly three) new templates which are almost ready to be released. These are original, "made for Blogger" designs which I hope to perfect and upload within the next week or two.I've taken a lot of inspiration from grid based designs for these new templates: the first is a minimalist template (with many options for customization), while the second is much more stylized and color-rich.
As some of you may have noticed, I'm still experiencing problems with my file host, though once I've been able to move everything over to the new server, I'll be able to complete and distribute these themes.
Creating an "Asides/Sideblog" section for Blogger
I've always envied the Wordpress function which allows bloggers to display a "sideblog" in the sidebar (a list of posts separate from the main section which often refer to recommended links or very short updates).Luckily, I've managed to tweak the Blogger template code to allow certain labels to be filtered from the main display of posts on the homepage. This will enable us to display these particular posts as a "sideblog" in the sidebar without being replicated elsewhere on the page.
This method does have some caveats (and a few minor issues, which I'm working on now), but for anyone interested in developing a sideblog I'm sure this will be a useful addition to the arsenal of Blogger hacks available ;)
A improved method of posting excerpts on the home page
For over a year now, I've been using Ramani's excellent hack to display excerpts of my posts on the homepage of Blogger Buster.However, I must admit that this has never satisfied my desire to display a true excerpt (based on the number of words/characters) which does not rely on editing the HTML code for each post.
So after MUCH searching, experimentation and tweaking, I think I have found a much more preferable solution which uses JavaScript and minimal editing of the template code.
At present, the JavaScript is quite bloated and the results differ between browsers. But at least it works! Once I am happy with the overall functions, I'll begin to use this function here on Blogger Buster and will of course write up a full tutorial for you to use this in your own Blogger template designs.
Animated tag cloud
This is the function I am most excited about! Thanks to Roberto, I learned about a beautiful animated tag cloud plugin which had been made available for Wordpress users. Needless to say I was fascinated by this, and was able to convert for use in Blogger templates:
There are several advantages to using this method:
- Special characters are more likely to be recognized and correctly displayed
- This method does not rely on externally hosted scripts, which makes the widget load much faster
- It is much easier to make alterations to the widget
- Comments are displayed in list format, and can automatically be styled to match the design of your blog.
At present, you would need to edit the contents of your Blogger template to add this new version of the "recent comments" widget due to current problems with Blogger's "Add widget" API. As soon as I am able to access the API successfully, I will work on a widget installer which will enable you to add this new widget with ease.
For now, here are the instructions to add this widget to your template by customizing your blog's HTML code.
How to add the new "Recent Comments" widget to your Blogger layout
Step One: Back up your template!
Firstly, you should make a full back-up of your existing template. This will enable you to restore your template to it's original composition if you accidentally make a mistake.
To make a back-up of your blog template, go to Layout>Edit HTML in your Blogger dashboard, and click the "Download full template" link near the top of the page.
This allows you to save a copy of your template to your computer as an XML file. Rename your template to help you find it easily, being sure to retain the ".xml" extension.
Step Two: Add new code to your template
In this step, we will add a complete widget (including the widget template) by adding HTML code.For this, you will need to access the Edit HTML page for your Blogger template. Do not click the "Expand widget templates" box as this may make it more difficult for you to see where the code should be added.
Using your browser's search function (CTRL+F or CMD+F) locate the following line of code:
which references the "class" or "ID" of sidebar.
Immediately after this line, paste this entire section of code:
Then preview your template. If you have made any errors in pasting this section of code, you will notice the error in your preview, or will receive an error message. If this is the case, click the "Clear Edits" link near the bottom of the page to revert your template back to normal, then begin again.
To offer a better understanding of where to paste the above section of code, here is an annotated screenshot:

Once you have correctly pasted this code, save your template. At first you will not be able to see the recent comments widget appear in your blog layout. We need to add the URL for your comments feed and tweak a few options before the widget will appear.
Step 3: Add Comment Feed URL
The final step to adding this new recent comments widget is to add the Feed URL for your comments feed.
To do this, go to Layout>Page Elements where you should see a new "Recent Comments" feed appear at the top of your sidebar.
Click on the "Edit" link for this widget, where you will be presented with the regular pop-up screen for a Feed Widget:
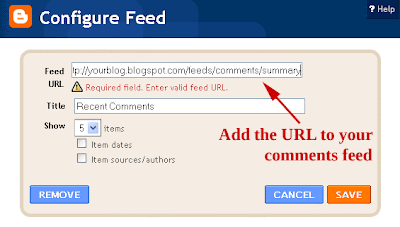
You need to add the URL of your blog's comment feed in the "Feed URL" box.
The default URL for your blog's comment feed will be something like this:
http://yourblog.blogspot.com/feeds/comments/default
Where "yourblog.blogspot.com" is the URL of your blog. If you use a custom domain, change this to the actual URL of your blog. For example, the URL for the Blogger Buster comments feed is http://www.bloggerbuster.com/feeds/comments/default
You should also tick at least the "Item Sources/Authors" box as this field will be used to display the commenter's name.
Optionally, you could also tick the "Item Dates" option if you would prefer to display the date when comments were added.
Once you have added the URL to your comments feed and ticked the appropriate options, click the "Save" button and take a look at your blog. You should now see your new "recent comments" widget appear in your blog layout.
When this widget is installed, you can move it around to a different part of your layout on the Layout>Page Elements page. As each entry of the comments feed is presented as a list item, the widget should take on the appearance of other list-type widgets in your layout.
Comments? Suggestions?
I hope this new version of the recent comments widget will be suitable for most needs and is easy to install in your Blogger template. Please let me know if you experience any problems when using this widget, or if you have any suggestions for how it may be improved, by leaving your comments below.
Initial photo by Rightee (Flickr Creative Commons).


In recent months, Blogger templates have increased in number and quality. After last week's 125 Excellent Blogger Templates post, many more remarkable templates have been released.
So from today and each Friday from now on, I'll be posting a new feature for Blogger Buster: a pick of the week's new Blogger template releases.
Here are 10 of the best free Blogger templates which have been released over the past couple of weeks, with links to the demonstration blogs and the author's download page.Vista 84 by 84 Productions

This is a sleek, three column template based on the theme of Windows Vista. It's among the first Blogger templates to include pagination by default, and features stylized icons for important links and sidebar lists.
Demo | DownloadBorboleta by Templates Nova Blogger
Demo | Download Blue Weed by Template Godown

Demo | DownloadVibrant by GosuBlogger

Demo | DownloadDF Marine by Blog and Web

A stunning conversion of the original Wordpress theme by Deziner Folio, this design features unique Ajax functionality in the sidebar and a striking header section. It may require some editing of the template for your links and other information, but is otherwise an excellent theme.
Demo | DownloadBrooklyn by Our Blogger Templates

This is a minimalist template in which most of the fonts and colors can be altered easily through the Blogger dashboard. There is no working demonstration blog of this template though from the screenshots I can say it does look very interesting and is ideal for the blogger who prefers to customize their theme.
DownloadSunshine by Our Blogger Templates

Here is another flexible theme from Our Blogger Templates which includes a beautiful header banner and styled layout. Again, there is no working demo blog, though the overall appearance is bright and stunning.
DownloadDate Night by Suck My Lolly

A pretty feminine theme made especially for Blogger users.
Demo | DownloadWhite Space by ThemeLib

Another minimalist and wholly customizable template by ThemeLib. This is a conversion of Brian Gardner's original theme for Wordpress and is useful for any style of blog or niche subject.
Demo | Download
Blogsmith by Aborregate
This is a simple, two column theme which was converted from a design by Free CSS Templates. A striking use of contrasting colors which should be useful for many styles of blog.
Demo | DownloadGenesis by InfoCreek

I was waiting for this beautiful theme to be converted for Blogger after reading the teasing preview on InfoCreek's blog!
This is an elegant dark theme which is ideal for bloggers posting vibrant images as the color scheme really helps photographs stand out. There are two columns in the sidebar and an integrated calendar icon for each posting date.
Demo | DownloadDo you design templates for Blogger?
I would like to make the Friday Showcase a regular feature here on Blogger Buster so readers can find the latest themes.
If you would like me to showcase our latest designs in future Friday listings, feel free to drop me a line or post your new themes in the dedicated forum thread and I'll do my best to include your designs in these regular showcase posts.
Please feel free to let us know what you think of this post and the selection of recent Blogger templates by leaving your comments below.
Blogger Widget Problem (sectionID error) and a temporary workaround
Posted by SoMeOnE at 9:42 AM Labels: Blogger News and IssuesAs many of you have expressed in your comments and emails, there seems to be an issue with installing widgets using the Blogger Widget API (widget installers).
From what I have read in various forums all widget installers are affected by this, including even the Feedburner widget to add an email form or blog list to a Blogger blog.
As yet, I'm unable to devise a solution for this problem, but I can offer a workaround for those who need to add a new widget to their layout. Here are the details of the problem and a temporary solution until the issue is resolved.The issue with adding widgets to Blogger layouts
Many of us have been experiencing problems when trying to add a widget using a third party "widget installer" such as the recent comments widget, Feedburner's email subscriptions code and even Amazon widgets.
We are able to follow any steps nescessary to add the widget to our blogs until we are redirected to Blogger's "Add a new widget" page, where we can customize the title, content and choose the blog where the widget will be installed.
At present, clicking the "Add widget to your blog" link results in a screen like this:
The top half of the screen explains that there is a missing required field in the form used to add the widget to our blog:
While the lower half includes a bX error code.We're sorry, but we were unable to complete your request.
The following errors were found:
sectionId: Required field must not be blank
It seems that the API for adding new widgets may either be in the process of an update or has a temporary error as everything up to this point seems to be working fine.
There are already several threads in the Blogger help group regarding this issue and many of us are trying to work out a solution to the problem.
I will of course update this post when the problem is resolved or when we have discovered a working solution, but in the meantime we can use a temporary workaround.A temporary work-around for the problem adding third party widgets
As far as I can tell, the API for adding new widgets works just fine up until the point of adding to a specific blog.
This means that when we arrive at the "Add Page Element" page, the code included in the "Edit Content" section should already be configured and suitable for our needs.
If you click the "Edit Content" link on the "Add Page Element" page, this will reveal the code which should be added as the widget content.
You can then copy this code to your clipboard, and paste inside a regular HTML/JavaScript gadget through the Layout>Page Elements page in your regular Blogger dashboard.
While this will take longer (and is certainly more troublesome) than the regular method to add a new widget, it is certainly preferable to being unable to add a new gadget at all!Your thoughts on the problem?
If you have any suggestions or know of a solution we could use for the widget installation problem, please let us know about this by leaving a comment or sending me an email.
Once this issue is resolved or documented further, I will be sure to update this post with the new information so we can begin using (and developing) widgets for our Blogger blogs!
Blogger's New "Reactions" Feature - How to add to customized blog templates
Posted by SoMeOnE at 1:54 AM Labels: Blogger News and Issues, Customize your Blogger TemplateBlogger have added a new feature for us to use in our post: Reactions. This widget acts like a mini-poll beneath each of your blog posts and offers the ability for readers to leave feedback quickly.

How to add "Reactions" to your Blogger template
To add this new function to your Blogger layout, you will need to activate the feature through Blogger in Draft. Once logged in to your Draft dashboard, go to Layout>Page Elements and click the "Edit" link for the "Blog Posts" widget.In this pop-up window, you will see the option to add "Reactions" to your posts:

Adding the required code to your template
Depending on the type of template you are using, you will need to use one of two methods to add the required code to your template.If you are using a default Blogger template with no modifications to widgets or the post layout...
Go to the Layout>Edit HTML page in your Blogger dashboard, and look for the "Revert Widget Templates to Default" link near the bottom of the page.
Clicking on this link will replace all of the widget templates with the updated code. All of your existing widgets will remain, so don't worry about losing any data! Instead, this will simply replace outdated code with new code, and ensure you can add all of Blogger's new features with ease.
If you use a customized/third party template...
You will need to add the required code to your template manually.
In this case, go to Layout>Edit HTML in your Blogger dashboard and check the "Expand widget templates" box.
Next, search for the following line of code (or similar):
Immediately after this line, add the following section of code:
Preview your template to see the "Reactions" add-on appear beneath each of your blog posts, and finally, save this new addition to your template.
If you cannot find the "post-footer-line" in your blog template, search for
Color Schemes for the Reactions Add-on
The colors for the reactions add-on are taken from existing variables in your color scheme:- Foreground: textcolor, textColor, mainTextColor
- Highlight: linkcolor, linkColor, mainLinkColor
To learn more about this new feature, be sure to read the announcement post on Blogger in Draft. Please let me know if there's anything else you need to know about this new feature by leaving your comments below.
 Generally I prefer to design Blogger templates from scratch than convert existing themes, but for Grid Focus, I made an exception.
This beautiful, grid based design is among one of the best and most customizable themes I have ever used. Converted from the original Wordpress theme by Derek Punsalan of 5thirtyone.com, it features a neat three column layout, an amazing navigation bar and integrated links for the home, main-content and blog feeds. Take a look at this theme in action in the demo blog, or read on for download and installation details.
Here is a full page screenshot of the Grid Focus theme for Blogger:
All of the colors in this template can be changed from the Fonts and Colors section in your Blogger dashboard. So if you prefer to have a bright pink background and electric blue links, you can change these features with ease!
In the download package for this theme, I have included both the XML template and a text version of the template. Full instructions for upload and editing of links in the navigation bar are also included in the download.
If you have any problems downloading this theme, please let me know by leaving a comment below. Full support is offered in the Blogger Buster forum if required.Credits and Copyight Notice
This theme is conveted from Derek Punsalan's original Grid Focus theme for Wordpress and is released under a Creative Commons Non Commercial Attribution License.
This means that you can use this theme in your own personal projects, but you cannot sell this theme!
Please remember to give credit where credit is due! The credit link to 5thirtyone.com must remain intact in this template (this is a condition of use from the original designer).Over to you!
I hope you enjoy this Blogger template and find the customization options to be suitable for your needs. Feel free to tell me your thoughts and opinions by leaving your comments below.
Numbered Page Navigation for Blogger
Posted by SoMeOnE at 12:00 PM Labels: Customize your Blogger Template The ability to 'paginate' Blogger blogs has been a long requested feature. Pagination allows us to number blog pages like those of a book, offering readers the ability to navigate deeper into the archives with ease when compared to the 'newer' and 'older' post links.
After many failed attempts, I was almost ready to admit defeat with this function until I discovered this excellent script by Mohamed of Blogger Accessories. This script replaces the default blog pager (links to newer, older and home pages) with numbered page navigation. Furthermore, it offers the ability to customize the number of page links and the number of posts displayed on each page.
Mohamed's Blogger pagination script may be installed using two different methods:
Both of these installation methods will achieve a similar effect. I personally find adding the code directly to the template makes it easier to customize the style of the pagination links, but if you feel uncomfortable editing your template, the widget installation may be much easier for you.
Here is how the finished installation will appear in your blog:
Once installed, these "page numbers" will appear on your home, archive and labels pages, allowing your readers to easily access pages in your archives. However, the page numbers will not appear on individual post pages. I've noticed many blogs which use pagination like this, and among them none displayed these page links beneath individual posts.
To learn more about using the numbered pagination script for Blogger, pop over to Blogger Accessories to read the useful tutorials Mohamed has posted. My Slightly Modified Version
As you may have noticed, I'm using a slightly modified version of this script here on Blogger Buster. When customizing the style of Mohamed's original version, I noticed a few elements which I preferred to change for my own preferences, and also modified the CSS for how the numbered links are displayed.
If you would prefer to use this slightly different version instead, here is what you should do.Add the CSS code to your style section
Firstly, copy all of the code below and paste this just before the closing tag in your template:
This should change the colors of text and links in the pagination to match the styles already present in your blog template. So if your default text is white against a dark background, the "Pages (#)" section of the script should appear the same way. The color for the background and hover effects of the numbers can be altered according to your preferences by editing the hex values to match the style of your own template. .showpageArea a {
text-decoration:underline;
}
.showpageNum a {
text-decoration:none;
border: 1px solid #ccc;
margin:0 3px;
padding:3px;
}
.showpageNum a:hover {
border: 1px solid #ccc;
background-color:#ccc;
}
.showpagePoint {
color:#333;
text-decoration:none;
border: 1px solid #ccc;
background: #ccc;
margin:0 3px;
padding:3px;
}
.showpageOf {
text-decoration:none;
padding:3px;
margin: 0 3px 0 0;
}
.showpage a {
text-decoration:none;
border: 1px solid #ccc;
padding:3px;
}
.showpage a:hover {
text-decoration:none;
}
.showpageNum a:link,.showpage a:link {
text-decoration:none;
color:#333;
}Add the JavaScript code beneath your posts
The second part of the installation is to add the JavaScript code beneath your posts which will locate and replace the existing "Newer/Older Posts" link. To add this script, go to Layout>Edit HTML in your Blogger dashboard, and do not tick the "expand widget templates" box (it's much easier to add the code while the widgets are contracted). Then find this section of code (or similar) in your template:
Immediately after the closing tag, add the following section of code:
Once you have added this code, attempt to preview your template to ensure there are no code errors. You will not be able to see the script in action on the preview, but this step ensures no adverse effects to your layout.
In the code above, you will notice that I have highlighted three sections of code in bold red. You may need to customize these sections to better suit your preferences:
On line 5, you may need to change the ".com" to reflect your domain extention if you use a custom domain.var isFirstPage = thisUrl.substring(thisUrl.length-5,thisUrl.length)==".com/";
This default installation should work fine for anyone hosted on Blog*Spot or a dot.com domain, but you will need to alter this section if your custom domain ends in .co.uk or .info for example.
In lines 19 and 20, you can change these values to alter how many posts are displayed on each page, and how many links will be visible at the same time.
The var pageCount = 5; section defiines the number of posts displayed on each page, while var displayPageNum = 5; defines the number of links which are displayed (eg: 1 - 2 - 3 - 4 - 5) beneath the posts section.
Once you have added this JavaScript code and made any changes nescessary for your needs, save your template and open up your blog in your browser. Now you should see the pagination links appear beneath your main posts section, and also on Labels and Archive pages.Your thoughts?
I hope this post has helped you learn about how numbered page navigation can be achieved in Blogger powered blogs using Mohamed's original methods or my slightly modified script.
Please let me know what you think of these methods, or if you experience any problems, by leaving your comments below.
125 More Excellent Blogger Templates (The Best Yet!)
Posted by SoMeOnE at 8:00 AM Labels: Blogger Template Resources
I have organized this list by style with links to the demo and download pages to help you find the perfect design for your blog, and hope you enjoy this inspirational list of Blogger templates as much as I did in finding them!
Colorful/Elaborate Designs
This selection of free Blogger templates are colorful, beautiful or ornate and are guaranteed to make your blog have a strong visual impact.1. Butterfly (Vector Three Column) by Blogger Tricks

I was so amazed to see this beautiful theme appear in my feed reader today! This is a stunningly beautiful template with three columns and icons beside important links.
Based on the original theme by Templates4all.com.
Demo | Download
2. Japanese Fleur by Blogger Tricks

3. Chasmogamous by Template Godown

4. New Morning by GosuBlogger

A fresh and lively theme, converted from the original design by WP Free Themes.
Details and download
5. Freedom Wall by GosuBlogger

This distinctive two column template features integrated navigation tabs and a unique calendar style.
Demo | Download
6. Art Imagination by Jackbook

This vivid three column template was converted from the original Wordpress Theme and features a beautiful background image which would be ideal for artistic or feminine blogs.
Demo | Download
7. Astro by ThemeLib

A colorful and beautifully stylized template with an ethereal theme. Converted from the original WP theme which was designed by UnoDesignStudio.
Demo | Download
8. Glass by Blog and Web

A subtle two column theme, based on the original design by Free CSS Templates.
Demo | Download
9. Lemon Twist by Jackbook

This is a truly awesome template with many sections in the footer and stylized throughout. Converted from the original WP theme by Far From Fearless.
Demo | Download
10. Agenda 02 by Blogs Made in Spain

A three column template with a notepad style appearance.
Demo | Download
11. Agenda 03 by Blogs Made in Spain

This template is styled like an artist's desk and is a wide two column layout.
Demo | Download
12. Agenda 04 by Blogs Made in Spain

This rustic theme is a two column design with a beautiful header image.
Demo | Download
13. Made in Spain by Blogs Made in Spain

Of all the notebook style templates I've seen, this is my favorite one of all :)
Demo | Download
14. Jonga by Layout for All

This two column template has an orange color scheme. Sorry there's no demo blog for this one, but from the screenshots it looks very good.
Download
15. Snow Crystals by El Blog de Lui

An unusual design with beautiful vector snowflakes, adapted from the template design by Free CSS Templates
Demo | Download
16. Vintage Style by Templates Para Novo Blogger

This tasteful theme is in hues of dark red.
Demo | Download
17. Capung by Template Godown

This single column template has a feminine appeal and is perfect for photobloggers. It includes a widgetized footer section for ads and other content, also a navigation bar for your important links.
Demo | Download
18. Florascent by Blogger Tricks

A beautiful blue toned theme with one sidebar to the left and floral design in the header.
Demo | Download
19. The Hobbit by Blogger Templates (Itmag)

This beautiful template has an ethereal presence.
Demo | Download
20. Galera Curtindo by Emporium Digital

A bold three column theme with centralized navigation buttons beneath the header.
Demo | Download
21. Bronzed by Testing Ground

An elaborate and original two column design.
Details and Download
22. Field of Dreams by Blogger Tricks

A truly stunning and colorful design with tabbed navigation in the header and a built in search function. Originally designed by NotSoBoringLife.
Demo | Download
23. Totally Lost by Our Blog Templates

Here is a great example of how beautiful imagery in the header can totally transform a basic design.
Details and Download
24. The Maldivian by Testing Ground

An elaborate fantasy theme with two sidebars to the right.
Details and download
25. Snail Blogger by Template Godown

Snail is an invigorating theme with split columns in the right hand sidebar. Converted with permission from the original design by Cinila.
Demo | Download
26. Cairo Concept by Testing Ground

A narrow, two column theme with a vivid header image.
Demo | Download
27. Sad Fish by ThemeLib

A simple two column theme with an aquatic feel.
Demo | Download
28. Creation by Blogger Tricks

A beautiful theme which includes an integrated navigation bar and calendar icons. Based on the design originally by Ophelia Nicholson.
Demo | Download
29. Vector Lover by Blog and Web

How stylish is this theme? It features a two column layout with integrated search function, and is converted from the original template by Styleshout.
Demo | Download
30. Rainbow Garden by Jackbook

An ornate and colorful three column template, based on the original design by Web Hosting Geeks.
Demo | Download
31. Assassins by Made in Spain

A two column template themed on the popular video game, Assasin's Creed.
Demo | Download
32. DH Theme for Blogger by STRA Mirage

A stunning template which was converted from the original WP theme.
Demo | Download
Dark Templates
This selection of Blogger templates use a dark color scheme.33. Dreamwork Redux by Jackbook

Stunning use of color and many great features make this one of the best dark Blogger templates I've ever seen. Based on the original design by Vinh Le.
Demo | Download
34. Graydient by Aborregate

A smooth dark design with pale area for the main blog content. I love the contrasting colors in the header logo which really sets this theme alight. Converted from the WP theme by Free WP Layouts.
Demo | Download
35. Funky Zine by Blogger Tricks

Adapted from the Wordpress theme by Chiq Montes, this dark design features a wide sidebar and integrated navigation links.
Demo | Download
36. Renewed by Ramdomness

This dark theme is based on the Minima template, but includes a much wider area for posts. Sidebar titles are highlighted in red, and the layout is hugely customizable.
Demo | Download
37. BT Dark Green by Blogger Buster and Blogging Tips

A wide two column theme with integrated navigation and search, plus mouseover effects in the sidebar. Converted from the Wordpress theme by Blogging Tips.
Demo | Download
38. Blue Greens by Our Blog Templates

This template makes stunning use of color contrasts and has a segmented footer for extra widgets.
Details and download
39. Dark World by akOOgle

A simple but professional dark template, ported from the original design by Hive Designs.
Demo | Download
40. Charcoal by Blogger Tricks

A stunning conversion from the original WP theme by Jinsona. Includes a navigation bar, built in feed and bookmark icons, and a wide posting column. Also available in three column format.
Demo | Download
41. Whale of a Time by Suck My Lolly

An original design with two column layout.
Demo | Download
42. Wiremesh by Abboregate

This dark two column theme highlights sidebar and title headings in vivid colors. Based on a design by Free CSS Templates.
Demo | Download
43. Macbook Pro by ThemeLib

A stylish dark template with three columns which is converted from the theme by Quality Wordpress. Perfect for Apple lovers!
Demo | Download
44. Zanblue by Blogger Tricks

A delicious dark theme with mouseover effects and stylish widgets. Based on the WP theme by Ophelia Nicholson.
Demo | Download
45. Elegant by Blogmundi

This three column layout is enhanced by the choices of color.
Demo | Download
46. Pepper by Blogger Tricks

Kranthi has done an excellent job of converting this beautiful dark theme. It features an integrated search function and feed icon in the header, with spaces for ads and two sidebars on the right. Converted from the original design by Jinsona.
Demo | Download
46. Green Magic by ThemeLib

This two column template is very easy on the eyes, and includes navigation links and calendar widgets for post dates. Based on the original design by iWebNet.
Demo | Download
47. Architect by George Petsagourakis

An unassuming theme with plenty of options for customization.
Demo | Download
48. DFire by GosuBlogger

This narrow two column theme is remarkable. It features a great color scheme and stylized sidebar headings. Converted by the original theme by Dark Faery Tale.
Demo | Download
49. Signus by Templates Para Novo Blogger

Demo | Download
50. Graffiti Art by Blogger Tricks

An outstanding two column template with plenty of color. Ported for Blogger from the original design by WPGalaxy.
Demo | Download
51. Template RS10 by Templates Novo Blogger

A dark themed template with well styled navigation and segmented columns in the footer. Converted from the original design by ThemeLab.
Demo | Download
52. Clean Dark by Blogger Tricks

A three column template whcih features a highlighted sidebar to draw attention to important content.
Demo | Download
53. Urban Artist by Blog and Web

A delicious dark theme with a wide sidebar and many built in features.Based on the original template by Styleshout.
Demo | Download
54. Connexion by Blogger Tricks

A stylish cityscape theme with integrated navigation beneath the header. Based on the original theme for WP by Jinsona.
Demo | Download
55. Gabfire Maq by GosuBlogger

A three column theme with plenty of space for ads. Based on the original theme by Gabfire.
Demo | Download
56. Windows Vista by ThemeLib

Minimalist Templates
This style of template offers a simple, clean appearance with few (if any) images.57. Honest Expressions by Aborregate

A professional style theme with two sidebars to the right of the main posts section. Based on a theme designed by Free WP Layouts.
Demo | Download
58. Addicted by Usario Compulsivo

A fresh inviting theme with three columns. Converted from the original theme by Darren Delaye.
Demo | Download
59. Minimalist E by Our Blog Templates

While this template may have a minimalist layout, I think the overall design is beautiful.
Details and download
60. Cool Calm Collected by BlogCrowds

The epitomy of minimalistic blog design!
Demo | Download
61. Complimentary by Aborregate

An exquisite template with mouseover effects.
Demo | Download
62. is_Simple by Blogmundi

A basic canvas on which you can impress your own customizations. This layout includes two sidebars to the right of the main column, and is very easy to use.
Demo | Download
63. Statement by Zona Cerebral

A fuss-free three column template with iconized links and integrated search function. Based on the original design by BlogOhBlog.
Note: Many pages on Zona Cerebral are currently unavailable, so I have linked to the mirror download location on BTemplates until the links are fixed.
Demo | Download
64. Enlight by Blog and Web

A fresh two column template with integrated navigation links.
Demo | Download
65. Red Planet by Jackbook

This minimalist design features an excellent choice of typography. It includes navigation links and an integrated search function. Based on the original theme by Free CSS Templates.
Demo | Download
66. Facebooked by GosuBlogger

Based on Justin Tadlock's excellent theme, Facebooked is a three column template in the style of this popular social networking site.
Demo | Download
68. Sederhana (Oh My Grid) by Template Godown

I love this three column, grid based theme which is based on Oh My Grid by Thomas at Orangescale. While using only monochrome colors for the overall layout, it becomes incredibly functional with the unique header layout, ads section and search function below the header. Be sure to check this one out for a truly professional and unique appearance for your blog!
Demo | Download
69. Genkit by GosuBlogger

This clean template has a fluid main posts column and a unique sliding tabbed navigation widget in the left hand side. Converted from the original theme by Ericulous.
Demo | Download
70. Clarity by GosuBlogger

Beautifully simple, this theme features a fluid layout which expands to fit the size of the reader's browser.
Demo | Download
Feminine Designs
Here is a selection of pretty feminine designs in various colors and styles.71. We Heart Stuff by STRA Mirage

Feminine and flirty, this pink toned theme includes two columns with navigation beneath the header.
Demo | Download
72. Mae Mulher by Emporium Digital

A beautifully designed feminine theme with a two column layout.
Demo | Download
73. Heart Attack by Suck My Lolly

A simple blue theme with elaborate header.
Demo | Download
74. Thoughtlog by GosuBlogger

A three column design in shades of lilac. Converted from the Wordpress theme designed by Scribble Scratch.
Demo | Download
75. Marco by Templates Novo Blogger

A simple, professional and feminine theme.
Demo | Download
76. Summer Love by Blog Crowds

A beautiful two column template with a subtle floral theme.
Demo | Download
77. Mode Parisienne by Suck My Lolly

A fresh feminine theme in pale blue.
Demo | Download
78. Celebrity Blog by Blogger Templates (Itmag)

An excellent template for celebrity bloggers, though this could also be adapted for any feminine themes blog. Converted from the original theme by Red Planet Media
Demo | Download
79. Isabella by Templates Para Novo Blogger

The sidebars in this feminine layout are aligned beneath the vector image on the left.
Demo | Download
80. Shoe Fetish by Randomness

Pink and girly, this template would suit any shoe-lover! Converted from the Wordpress theme by Better in Pink.
Demo | Download
81. Bordados 01 by Blogs Made in Spain

An embroidery style template with pretty flowers and a butterfly in the header.
Demo | Download
Professional/Corporate Themes
Clean lines and effective layouts make these designs suitable for business and technical blogs.82. TechJunkie by Blog and Web


An elegant two column theme with contrasting sidebar. Ported from the original theme by Just Skins.
Demo | Download
84. Blue Blog by Zona Cerebral

85. Techlure by Blogger Tricks

86. Adspress by Template Godown

A simple and professional theme with a built in navigation and search bar.
Demo | Download
87. Indomagz by GosuBlogger

This professional magazine style theme is based on the premium theme by Magznetwork.
Demo | Download
88. Business Blue by GosuBlogger

This three column theme is ideal for a technical or business blog. It includes integrated navigation links and a themed feed icon beneath the header.
Demo | Download
89. Love Blog by GosuBlogger

I like the modest style fo this wide two column theme which includes a navigation bar and integrated search. Based on the theme originally designed by ThaSlayer.
Demo | Download
90. Softlight by B-Themes

This graceful template uses a two column layout with tabs for important navigation links. Based on the WP design by MakeQuick.
Demo | Download
91. Techno by Blog and Web

This blue toned three column template has a technical feel. Based on the CSS template by Free CSS Templates
Demo | Download
92. Naranjo by Templates Para Novo Blogger

With rounded corners and a three column layout, this beautiful template is sure to be useful for any blog niche.
Demo | Download
93. Advanced Tech by Aborregate

A vibrant two column template converted from a theme by Free WP Layouts.
Demo | Download
94. Altruism by Abboregate

This simple two column layout is designed in hints of green. Based on the original design by Node33.
Demo | Download
95. Numerology by Aborregate

A jaw-dropping design with oversized header and great color scheme. Converted from a theme designed by Free CSS Templates.
Demo | Download
96. Keepsheep by Template Godown

This stylish two column layout includes an integrated search function and navigation bar. Based on the original design by Keedie.net.
Demo | Download
97. PassionDuo for Blogger by eBlog Templates

This ad-ready theme was originally designed by DesignSaurus for Daily Blog Tips, and has been converted for Blogger by eBlog Templates.
This theme features many spaces for ads and banners, and is fully widgetized. Please note: you must register a free account with eBlog Templates before you are able to download this theme.
Demo | Details
98. Happie by Blog Mundi

Bright colors help this three column theme to stand out.
Demo | Download
99. Dicas Blogger by Dicas

Simple but so functional, this template has a wide area and two columns below in the right hand sidebar.
Demo | Download
Magazine Style
The recent web design trend for magazine style layouts has found its place in the realm of Blogger template design. Here is a selection of some magazine style templates for Blogger.100. Visionary Reloaded by Blogger Templates (Itmag)

Here is another template which will wow you! Based on Justin Tadlock's fabulous theme for Wordpress, this Blogger conversion includes everything you could expect from a magazine style template. To say I am impressed is an understatement!
Demo | Download
101. Template Tabs by Templates Para Voce

This layout features many different areas for widgets and comes complete with tabbed navigation in the wide sidebar.
Demo | Download
102. Revolution by Aborregate

If you're at all interested in theme and web design, chances are you will have heard the name Brian Gardner before. This Blogger template is based on one of Gardner's most famous templates for Wordpress: Revolution. It includes a magazine style layout and translates almost perfectly for Blogger! Certainly a professional style theme to check out.
Demo | Download
103. Personal Mag by ThemeLib

Converted by the beautiful theme designed by WP Theme Designer, this excellent template features a wide layout with two sidebars on the right.
Demo | Download
104. Langit by GosuBlogger

GosuBlogger uses this template for his own blog which proves this is an excellent design to use. I consider this a magazine style template as it includes many different areas for widgets and includes a navigation bar in the header.
Demo | Download
105. Nice! by Templates Para Voce

A simple magazine style theme with tabbed navigation above the main posts section.
Demo | Download
Landscape/Cityscape
These Blogger templates feature a landscape or cityscape image in the header: an increasingly common trend in blog template design.106. Isolation by Our Blog Templates

A striking landscape design with a wide sidebar to the right and integrated navigation.
Details and download
107. Greenery by Blog and Web

A two column theme in shades of green. Ported from the original design by LEMONed.
Demo | Download
108. City Scape Theme by Randomness

This outstanding dark theme features a sidebar to the left of the main column and stylized CSS for block quotations. Converted from the original theme by Tutorial Blog.
Demo | Download
109. Grassy Sunset by Jackbook

A narrow two column template with a beautiful header.
Demo | Download
110. Las Vegas by El Blog de Lui

Features a stylish cityscape of Las Vegas beside the narrow header title. Adapted from a template by Free CSS Templates.
Demo | Download
111. Nitelife by Blogger Tricks

This urban theme is based on a design by Ophelia Nicholson, and features three columns with a stunning header image.
Demo | Download
112. A New Day by Blogger Buster

A wide two column theme with transparency across the header image.
Demo | Download
113. Midnight by Aborregate

A dark yet colorful cityscape theme, adapted from a design by Free CSS Templates.
Demo | Download
114. External by Our Blog Templates

A classic two column theme with three columns in the footer. Sorry there is no demo blog available for this template, but you can see the full layout on the download page in a full length screenshot.
Download
Miscellaneous Designs
While these templates don't fit neatly into any of the other groups above, all are remarkable designs and deserve their place on this list!115. Grungy by Blogmundi

The grunge style of modern web design is toned down in hues of blue.
Demo | Download
116. Birds on a Wire by Randomness

A fresh and simple theme which was converted from the WP template by Better In Pink.
Demo | Download
117. Natural Essence by GosuBlogger

This earthy toned design is simple and elegant.
Demo | Download
118. Vista Multi Style by Blogger Templates (Itmag)

Here is another jaw-dropping template which really must be seen in action.
Demo | Download
119. iBlock Template (for iPhone) by iBlock

This remarkable design is the first Blogger template specifically designed for viewing on the iPhone (or other handheld devices). There is also CSS for viewing in a desktop browser which can be downloaded from the iBlock site.
Demo | Download
120. Blanco Negro by Blogs Made in Spain

A striking black and white template with two sidebars on the right.
Demo | Download
121. BookSmarts by Suck my Lolly

This simple three column template features a beautiful header image and sidebars to either side of the main posts column.
Demo | Download
122. Twitter Theme by GosuBlogger

Perfectly styled, this Twitter theme offers a clean and funky way to present your blog.
Demo | Download
123. Jeans Three Column by InfoCreek

A three column template with a denim style background and stylish headings.
Demo | Download
124. Photoblog by Our Blogger Templates

A beautiful one column theme which is ideal for wide images.
Details and download
125. Communist by Blogger Tricks

Kranthi describes this as a niche template, though with a slight change to the image in the header, I'm sure this could be made suitable for almost any style of blog. I love the color scheme (red is one of my favorites to be seen in web design) and the clean lines make for a professional appearance. This template is based on the original design by Jinsona.
Demo | Download